Hiring begins with a well-written job post. If your opening is clear, structured, and targeted, you are more likely to attract relevant candidates and reduce irrelevant applications. CANSPLA makes this process simple by giving recruiters a guided workflow to create and manage job posts from one place.
Whether you are posting your first opening or setting up a repeatable hiring workflow, this guide will help you understand how to create your first job post on CANSPLA step by step.
Why creating a proper job post matters
A job post is not just an announcement. It is the first layer of screening. A clear job title, defined experience range, accurate location, detailed description, and relevant keywords help attract applicants who actually match the role.
On CANSPLA, the process is designed to separate essential information from optional details and workflow settings. This helps recruiters stay organized while making job creation faster and easier.
The platform also supports communication settings and team assignment, which means your post is not only published properly but also managed properly from the start.
Step 1: Go to the Jobs page
To create a new opening, start from the Jobs page. The followying screenshot shows that this page gives you:
- a list of job posts created by you
- filters to sort job posts
- a visible Create Job button in the top-right area
This layout is useful because it combines job creation and job management in a single place.
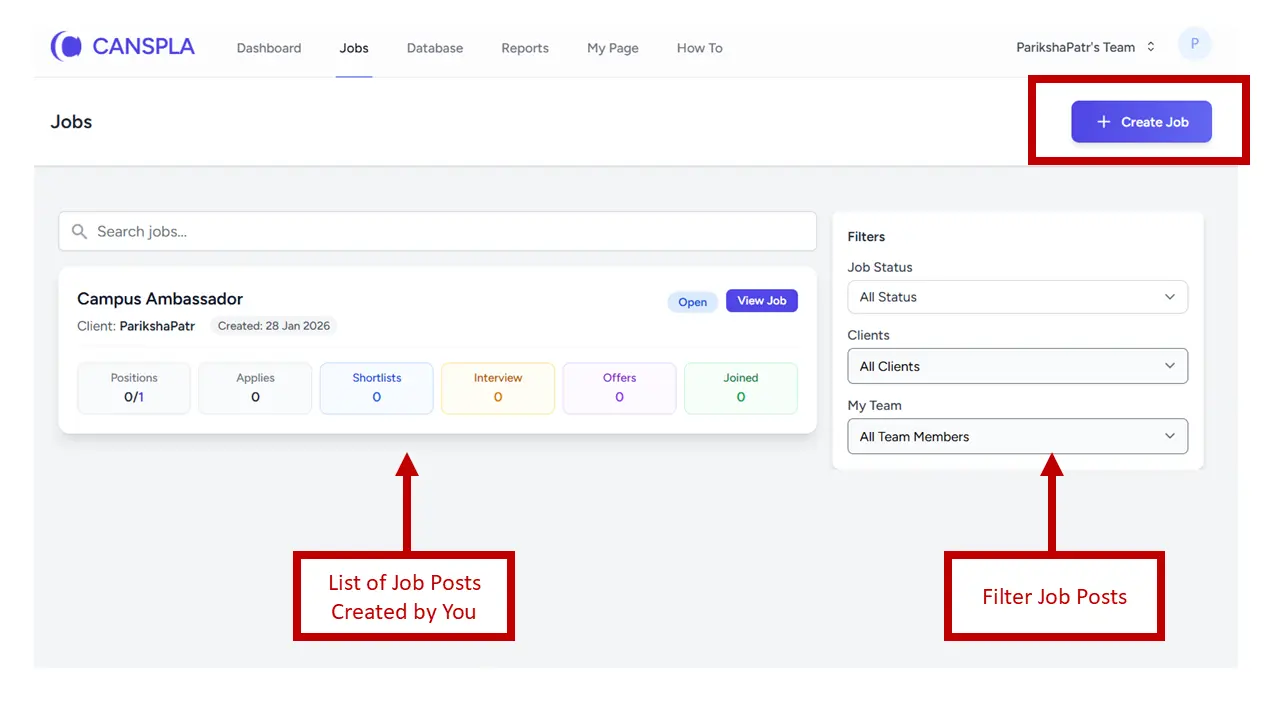
You can review existing jobs, filter them by criteria, and create a new one without leaving the page. The above screenshot clearly highlights the list of your job posts, the filter section, and the Create Job button.
Step 2: Click the Create Job button
Once you click Create Job, a job creation panel opens. The below screenshots show that the flow is divided into three tabs:
- Job Info
- Client Info
- Settings
This structure keeps the form organized and prevents job creation from feeling overwhelming.
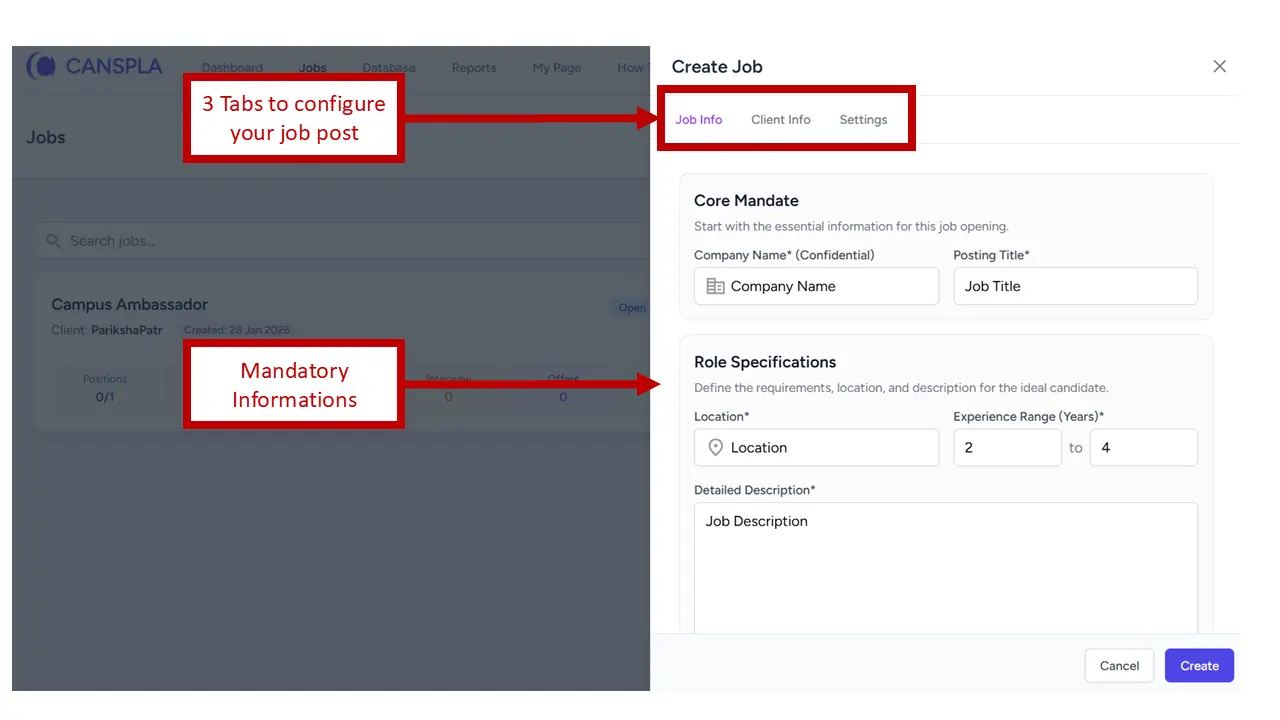
Each tab handles a different part of the setup, which makes it easier for recruiters to focus on one stage at a time. The above screenshot clearly identifies these three tabs as the main sections used to configure a job post.
Step 3: Fill in the mandatory details in Job Info
The Job Info tab contains the essential information required to create the job post. This tab is the section for mandatory information, including:
- Company name
- Posting title
- Location
- Experience range
- Detailed description
These are the core fields that define the job opening. Without them, candidates may not understand who the role is for, what kind of profile is expected, and whether the opening is relevant to them.
The previous screenshot shows these mandatory sections under the headings for core mandate and role specifications.
Add a strong posting title
Your posting title should be clear and searchable. A specific title performs better than a vague one. For example:
- React Developer
- Sales Executive
- Python Engineer
- Talent Acquisition Specialist
- UI/UX Designer
A precise title helps the right candidate identify the opportunity quickly.
Set the right location and experience range
This is important because candidates usually decide whether to apply based on fit.
If your job is meant for professionals with 2 to 4 years of experience, you can define that clearly in the form. This helps reduce mismatched applications and makes filtering easier later.
Write a detailed job description
A detailed job description gives candidates the context they need before applying. It should ideally cover responsibilities, expectations, required skills, and the type of person likely to succeed in the role.
The better your description, the more likely you are to receive relevant applications instead of random resumes.
Step 4: Add keywords you want to find in resumes
One of the most useful parts of the CANSPLA job creation flow is the keyword section. The following screenshot highlights a field where recruiters can enter the keywords they want to look for in candidate resumes. The interface allows keywords to be added as tags by pressing comma or enter.
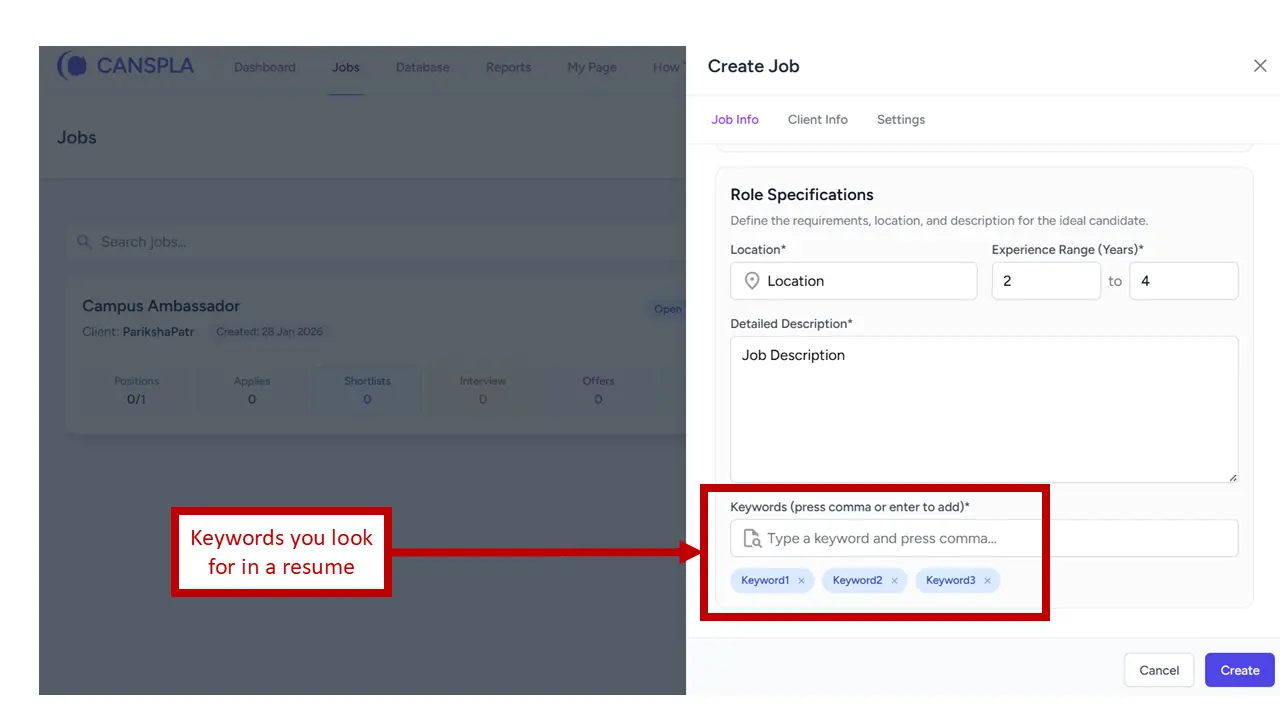
Note: Keywords are hidden from candidates, only you can see them to prevent exploitation.
This feature helps recruiters define what matters most for the role. For example:
For a React job post, your keywords may include:
- React
- JavaScript
- TypeScript
- Redux
- REST API
For a sales role, your keywords may include:
- Lead generation
- B2B sales
- CRM
- Negotiation
- Pipeline management
Choosing the right keywords helps align the job post with the type of resumes you actually want to receive.
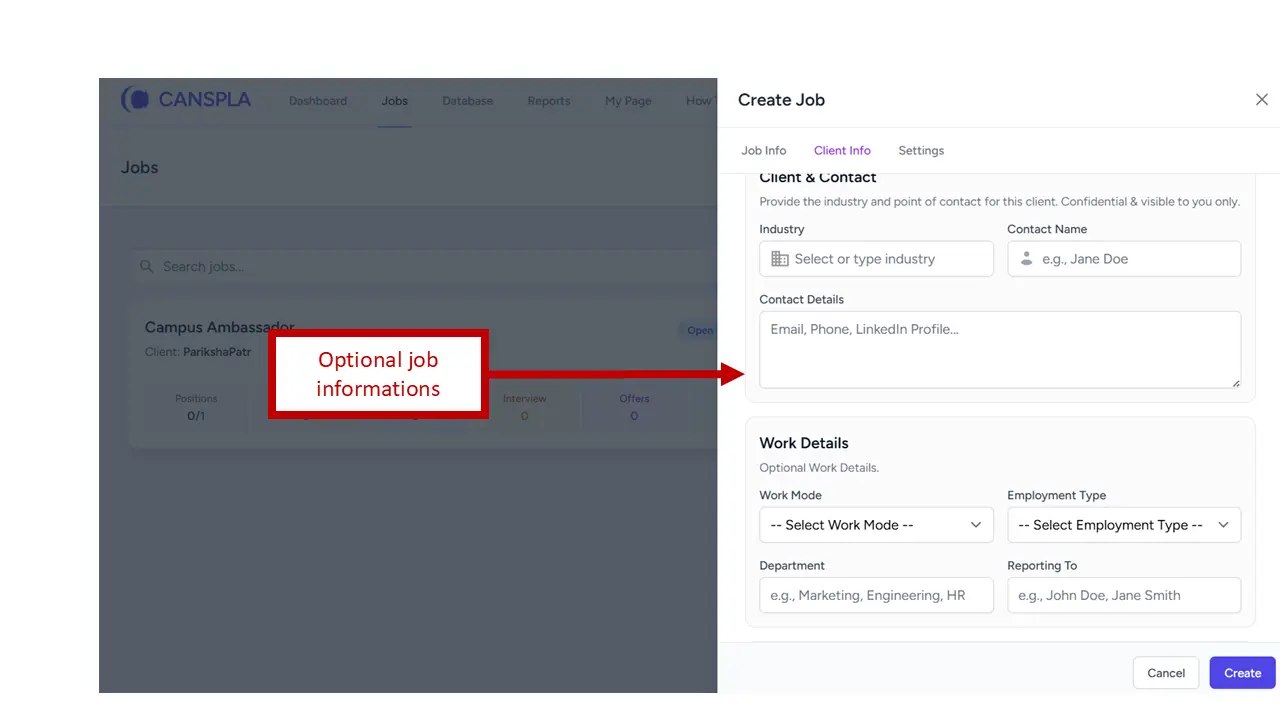
Step 5: Add optional details in Client Info
The Client Info tab is designed for optional job information. The following screenshot shows fields such as:
- Industry
- Contact name
- Contact details
- Work mode
- Employment type
- Department
- Reporting to
These details are not always required to create a job post, but they add useful context both for recruiters and candidates.
Why optional fields are still valuable
Optional fields make a post more complete and help in internal coordination. For example:
- Work mode tells candidates whether the role is remote, hybrid, or on-site.
- Employment type makes it clear whether the role is full-time, contract-based, internship, or part-time.
- Department helps with internal organization.
- Reporting to provides clarity on the team or manager structure.
If you are posting roles regularly or managing openings for different stakeholders, these extra details can make your hiring process more efficient.
Step 6: Configure communication and ownership in Settings
The Settings tab gives you workflow controls that go beyond the basic job post. The following screenshot highlights three key options:
- Send acknowledgment to candidate
- Email response copy
- Assign team member to the job
These settings help recruiters create a smoother hiring experience and manage responsibilities better.
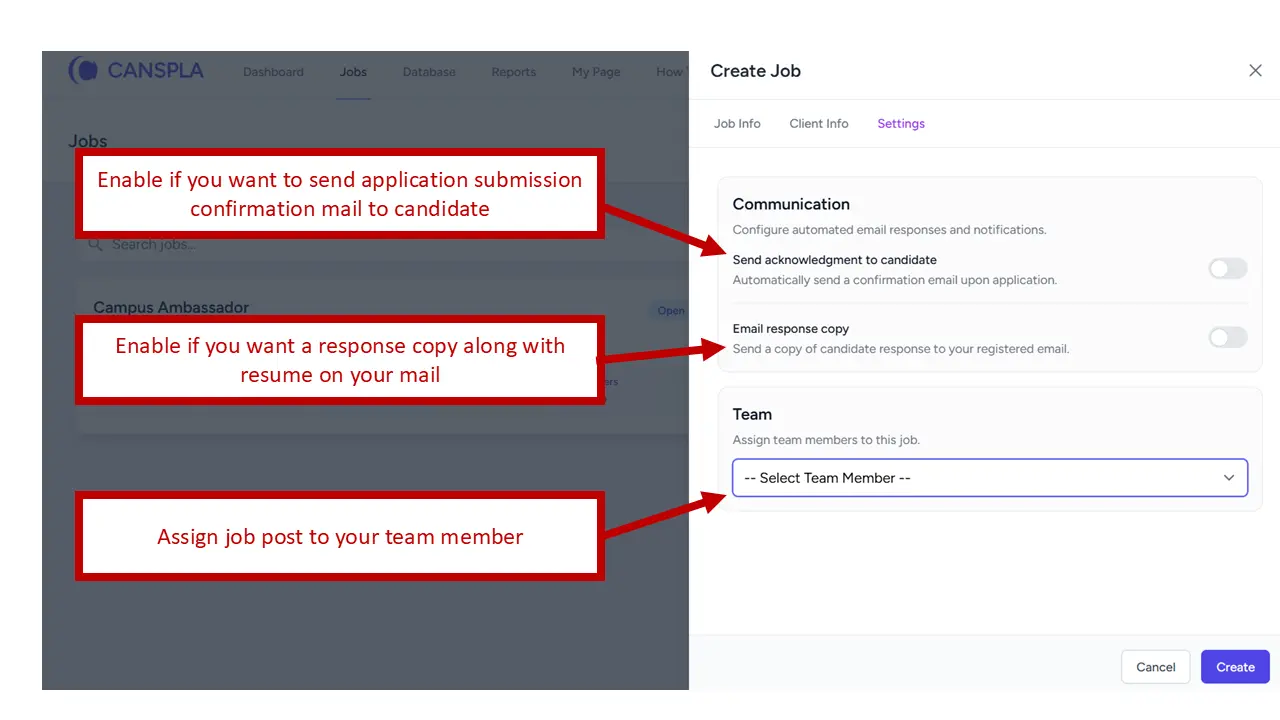
Enable candidate acknowledgment email
This option allows you to send an application submission confirmation mail to the candidate. It is a simple feature, but it improves candidate experience significantly. Applicants feel reassured when they know their application was received successfully.
Enable email response copy
This option lets you receive a response copy along with the candidate’s resume on your email. It is useful if you want parallel visibility in your inbox while also managing applications through the platform.
Assign the job post to a team member
This feature is available for business accounts. If multiple recruiters or hiring managers are involved, CANSPLA lets you assign the job to a team member directly from the Settings tab. This ensures ownership is clear from day one and reduces confusion about who should manage the role.
Best practices for your first job post on CANSPLA
Creating the form is easy, but the quality of the post still matters. Here are a few practical ways to improve results:
- Use a specific title: Candidates search by title. The more accurate the title, the better the job post performs.
- Keep the description clear: Do not overload the description with unnecessary text. Focus on responsibilities, expectations, and must-have skills.
- Add only relevant keywords: Keywords should reflect the real skills and experience needed for the role.
- Use optional fields thoughtfully: Add work mode, employment type, and department where it improves clarity.
- Turn on candidate communication: Acknowledgment emails can improve trust and create a more professional impression.
- Assign ownership early: If your team is hiring together, assign the role immediately so it does not get delayed later.
What happens after you create the job post
After the job post is created, it appears in the Jobs section along with your other openings. The first screenshot shows a card-based layout with stats and actions around each post, helping you keep track of jobs from a central view.
This means CANSPLA is not only helping you create the post, but also manage and review it efficiently after publishing.
Final thoughts
If you are using CANSPLA for the first time, creating your first job post is straightforward. The platform guides you through mandatory role details, lets you define resume keywords, supports optional client and work information, and gives you practical workflow settings like acknowledgment emails and team assignment.
The above screenshots clearly show that CANSPLA is designed to help recruiters move from job creation to job management in a clean and organized way. If your goal is to publish a professional opening quickly and attract more relevant candidates, this workflow gives you a strong starting point.
FAQ
How do I create my first job post on CANSPLA?
Go to the Jobs page, click the Create Job button, and fill in the details across the three tabs: Job Info, Client Info, and Settings.
Which fields are mandatory in a CANSPLA job post?
The required fields shown in the screenshots include company name, posting title, location, experience range, job description and keywords.
Can I add keywords for resume matching in CANSPLA?
Yes. The Job Info section includes a keyword field where you can add tags for the keywords you want to find in resumes.
Are all job details mandatory?
No. The Client Info tab contains optional fields such as industry, contact name, work mode, employment type, department, and reporting to.
Can I send confirmation emails to candidates automatically?
Yes. The Settings tab includes an option to send acknowledgment emails to candidates after application submission.
Can I assign a job post to a team member?
Yes. The Settings tab also includes a team assignment option so the job post can be owned by a team member.